1111
/in /by Steve BartonAlarm Management
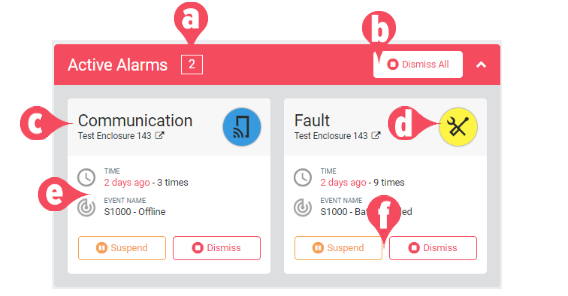
ARCO enables you to monitor quick and detailed communication between system sensors and the S1000 Smart Controller with a centralised Alarm monitoring module.
-
Active Alarm – Displays the numerical value of all currently active alarms in the system.
Clicking on the Alarm Panel sends you to the Alarm Dashboard.
-
Dismiss All – Click to ignore all active alarms in the system.
-
Alarm Name – Displays the custom name of the alarm. Please refer to the Alarm Kind section below for more details.
-
Alarm Icon – Displays the custom icon of the alarm. Please refer to the Alarm Kind section below for more details.
-
Alarm Details – Displays the timestamp of the alarm and the event name trigger.
-
Control Buttons – Click to suspend or dismiss the selected alarm.
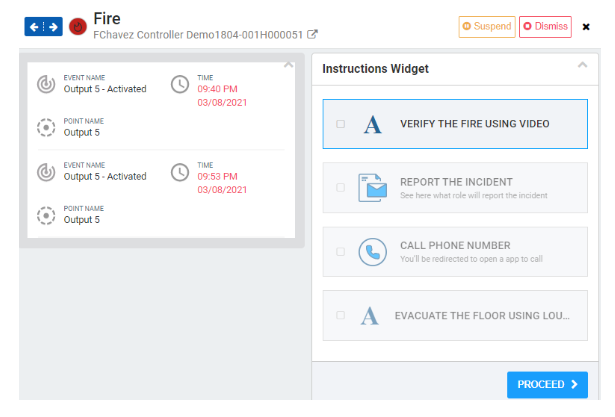
Alarm Dashbord
Location Services
ARCO enables you to define an area that a user and asset through the Location Service. The location is obtained from the GPS coordinates, or the Readers recently used.
Location Management
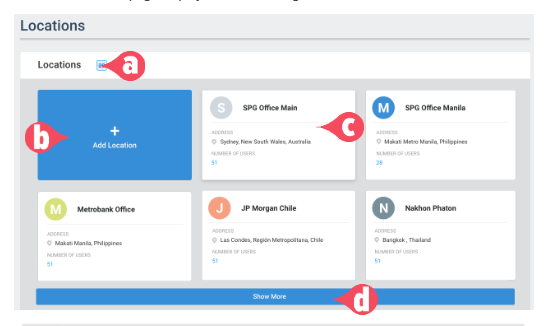
The Location is the default page displayed when clicking the Hardware module.
-
Location Count – Number of Locations currently in the system.
-
Add Location button – Enables you to add a new Location in ARCO. The next section will discuss the full details about adding sites.
-
Card Panel – Displays the details of the Location. Click to view Location information.
-
Show More – Click to display more Locations.
Location Information
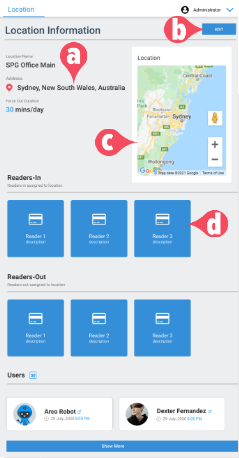
Click the Location card panel to view the Location Information.
-
Edit button – Enables you to edit a Location in ARCO.
-
Location Information – Details about the location.
-
Map – Displays the google map details of the Location.
-
Readers-In – In Readers assigned to the Location.
-
Readers-Out – Out Readers assigned to the Location.
-
Users – List of users currently in the Location.
Add Location
ARCO enables you to add new Locations to the Location Management page.
1
Click the Add Location panel.
2
Enter the following required information:
-> Location Name – Needs to be unique to each Location. Requires alphanumeric characters with no spaces and a maximum length of 255.
-> Address – Requires alphanumeric characters and a maximum length of 255.
-> Map – Centre the site location using the google map interface. Click Set Location link on the upper left.
-> Force Out Duration – Toggle ON or OFF.
User will automatically log out on the set time duration in minutes.
-> Readers-In – In Readers assigned to the Location.
-> Readers-Out – Out Readers assigned to the Location.
3
Click the Create button.

4
You will be taken back to the Location page.
Reports
Access to real-time information helps you visually understand changing business conditions so you can make decisions based on the real-time data you have gathered with reports. ARCO enables you to identify trends, sort out quantities, and measure the impact of system activities.
Report Management
ARCO enables you to display Reports based on selected search words and information filters. The Reports can then be downloaded for sharing or used for more complex analytics.
Available reports are for Users. Credentials, Status, Events and Sites.

-
Search bar – Enables you to search for specific Reports by their name.
-
Report filter – Click to open and close panels for each Report type available.
-
Add Report panel – Enables you to add new Reports in ARCO. The next section will discuss the full details about adding Reports.
-
Report Panel – Displays the details of the Report. Click to view the information.
Add Report
1
Click the Add Report panel on a report type. This will take you to the Add Report page.
2
Enter the following required information:
-> Name – Needs to be unique to each Report. Requires alphanumeric characters with no spaces and a maximum length of 255.
-> Description – Requires alphanumeric characters with no spaces and a maximum length of 255.
-> Report Configuration – Select the information required for the specific report.
3
Click the Save button when you have completed all the required information.
4
You will be taken back to the Reports page.
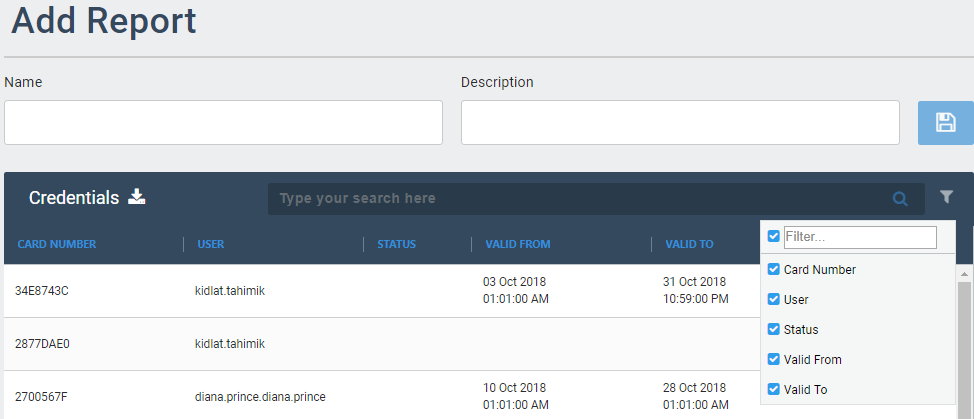
Report Configuration
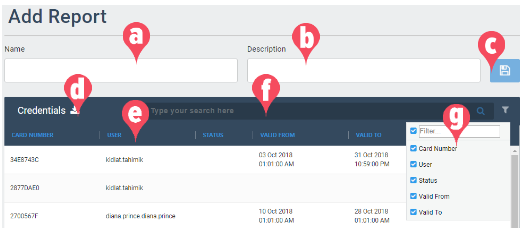
-
Name – Unique name of the report.
-
Description – Short information about the report.
-
Save button – Click to save the report.
-
Export –Download the displayed report in different file formats: CSV, PDF or XLS.
-
Column header – Displays the data types on the current report
-
Search Bar – Enables you to search for specific data.
-
Search Filter – Enables you to specify the data types to be displayed.

